|
|
Transform Your PC into a Versatile Voice Recorder with Dexster Audio Editor |
|
|
| |
| |
|
|
| |
In today's digital age, having a reliable voice recorder on your PC is indispensable for various purposes such as recording podcasts, interviews, lectures, conversations, and more. With the advancement of technology, transforming your PC into a powerful voice recorder has become easier than ever. Dexster Audio Editor emerges as a comprehensive solution, offering a plethora of features tailored to meet your recording needs.
Dexster Audio Editor allows you to record your voice effortlessly and save it in a multitude of audio formats including MP3, WAV, WMA, AAC, M4A, FLAC, OGG, and more. Whether you're a beginner or an experienced user, Dexster's intuitive interface makes it easy for anyone to navigate and utilize its features effectively.
Follow these simple steps to unlock the full recording potential of your computer and embark on your journey of capturing crystal-clear audio for podcasts, interviews, lectures, and beyond. |
| |
| Step 1: Download and Install Dexster Audio Editor |
| Begin by downloading Dexster Audio Editor here. Once the download is complete, follow the installation instructions to set up Dexster on your PC. Rest assured, Dexster is a safe and verified application. |
|
| |
| Step 2: Configure Recording Settings |
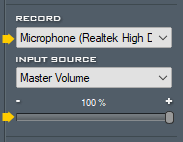
| After installing Dexster, launch the application. On the right panel, under the "Record" section, select the microphone input and adjust the volume level to your preference. This ensures that Dexster captures your voice with clarity during recordings. |
 |
| |
| Step 3: Initiate Recording |
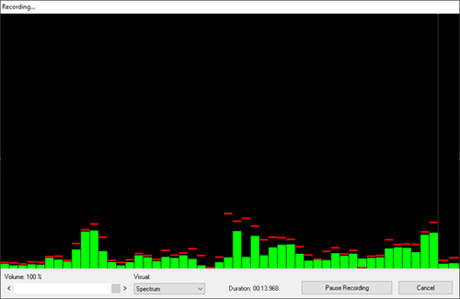
| With the recording settings configured, you're ready to start capturing your voice. Click on the record button located on the toolbar to begin the recording process. Dexster will commence recording your voice with precision and clarity. |
 |
| |
| Step 3: Set Recording Duration (Optional) |
| Dexster offers the flexibility to choose between manual or automatic recording duration. If you prefer to control the recording duration manually, simply leave the setting as is. Alternatively, if you want the recording to stop automatically after a specified duration, you can set the time limit accordingly. |
 |
| |
| Step 5: Perform Your Speech or Conversation |
| Once Dexster starts recording, deliver your speech, conduct your interview, or engage in your conversation as desired. Dexster ensures that every word is captured faithfully, allowing you to focus on the content without worrying about technicalities. |
 |
| |
| Step 6: End Recording |
| When you've finished recording, simply click on the "Cancel" button to stop the recording process. Dexster will promptly halt the recording, ensuring that you capture only the intended audio without any unnecessary pauses or disruptions. |
| |
| Step 7: Save Your Recording |
| To preserve your recording for future use or sharing, navigate to the "File" menu and select "Save As." Choose your preferred audio format from the extensive list provided by Dexster, including popular options such as MP3, WAV, WMA, AAC, M4A, FLAC, OGG, and more. |
| |
| Step 8: Optional - Edit and Enhance Your Recording |
| If desired, Dexster allows you to further refine your recordings by trimming, deleting, or editing sections as needed. Whether you're removing unwanted segments, enhancing audio quality, or adding effects, Dexster provides the tools to tailor your recordings to perfection. |
| |
| In conclusion, Dexster Audio Editor offers a robust solution for transforming your PC into a versatile voice recorder. Whether you're a content creator, journalist, educator, or anyone in need of reliable recording capabilities, Dexster empowers you to capture and manage your audio recordings with ease and efficiency. |
|
|
|
| |
|
| |
| |
|
| |
 |
Dexster Audio Editor |
| Price: USD 45 |
| for Windows 7, 8, 10, 11 |
| |
 |
 |
| |
|
|
| |
|
|
|
|
|
|
|