| |
| |
 |
Dexster Audio Editor |
| Price: USD 45 |
| for Windows 7, 8, 10, 11 |
| |
 |
 |
| |
|
|
| |
|
| In this guide, I will walk you through the steps to effectively use Dexster Audio Editor software for editing audio files and saving them in the MP3 file format. By following these straightforward steps, you'll be able to make the most of this powerful tool: |
1) Open / Record
2) Edit
3) Save |
|
| Step 1. Open |
| To load an audio file for editing using Dexster Audio Editor, simply locate and click on the "Open" button located on the toolbar. This action will prompt the open file dialog to appear on your screen. Next, navigate to the desired source file within the dialog and click on the "Open" button to initiate the loading process. As a result, you will be presented with a sequence of waveform visualizations, representing the audio file you have just loaded. |
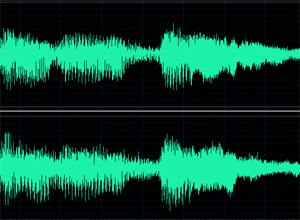 |
| Upon observation, you may notice that the waveform in Dexster Audio Editor is divided into two sections. This division indicates that the audio file being edited is in a stereo format, with the left channel displayed at the top and the right channel displayed at the bottom. The waveform visually represents the shape and form of the audio signal, much like the image depicted above. Dexster's audio editing functionality relies heavily on visual cues, enabling users to make edits and modifications based on the graphical representation of the audio. |
| |
| Step 1: Record |
| You can also capture sound for editing purposes, Dexster Audio Editor offers a convenient feature for this. Simply locate and click on the "New" button on the toolbar. This action will initiate the creation of a new waveform specifically designed for recording audio. |
 |
Take a look at the right-side of Dexster Audio Editor interface. You will notice a dedicated option for recording, similar to the image provided above. To initiate sound recording, it is important to select the appropriate sound driver and input source. In the first dropdown menu, choose the sound driver that is currently in use by your computer. This ensures that Dexster Audio Editor captures audio from the correct source.
If you are capturing the sound from internet streaming, CDs, sound from player like RealPlayer, Windows Media Player, QuickTime, and etc. Look for "Stereo Mix, Stereo, Loopback, Wave, Wave Out Mix, Record Master or All" under the input source. (Please note that the source name might be varies according to what sound cards you have)
For sound capturing from the external devices like radio, tapes, CDs, TV, telephone, and etc. Look for "Line-In" as the input source. (Please note that the source name might be varies according to what sound cards you have)
For direct sound capture from mic, look for "Mic" as the input source.
Before starting the recording process, it's essential to adjust the recording volume to your desired level. You can do this by using the volume controls provided within Dexster Audio Editor. Once you're satisfied with the recording volume, simply click on the "Record" button located on the toolbar to begin capturing audio.
To stop the recording, locate and click on the "Stop" button on the toolbar. This action will halt the recording process and save the recorded audio for further editing or processing |
| |
| |
| Step 2. Edit: |
| In this tutorial, we will focus on applying Noise effects to the selected area of the waveform. Dexster Audio Editor offers a wide range of features and capabilities, but for the purpose of this tutorial, we will keep things simple and straightforward. |
 |
| With the audio file already opened or recorded, position your cursor over the waveform area. Left-click and hold the mouse button while dragging it towards the right to define the desired selection area. Release the mouse button once you have selected the desired portion of the waveform. The selected area will be highlighted or indicated visually, similar to the image provided above.To preview the selected section, click on the "Play" button located on the toolbar. This will allow you to listen to the audio within the selected area. |
| |
| Once you have successfully selected a portion of the waveform, locate and click on the "Effects" menu in the Dexster Audio Editor. From the dropdown menu that appears, choose the option "Insert Noise." |
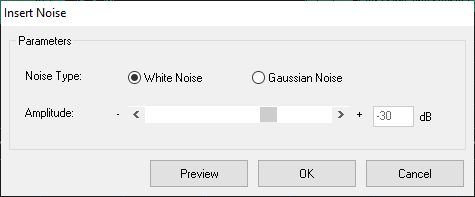 |
Set the following parameter values:
Noise Type: white noise
Amplitude: -30 |
| |
| Click on the "Preview" button to listen to a preview of the audio with the applied Noise effect. This allows you to assess the impact of the effect on the audio. Upon previewing, you may notice the addition of noise or distortion to the audio. If you are satisfied with the result, click on the OK button to apply the effect. |
| |
| |
| Step 3: Save |
| In the final step, we will save the edited audio file with the applied changes. Follow these instructions: |
| a) Click on the "File" menu in Dexster Audio Editor. |
| b) From the dropdown menu, select "Save As..." This action will open the Save File dialog. |
| c) In the Save File dialog, navigate to the desired output location by browsing through your file system. |
| d) Specify a new filename for the edited audio file. |
| e) In the "Save as type" or file format dropdown menu, choose "MP3 Files (*.mp3)" to save the file in MP3 format. |
| f) Click on the "Save" button to save the changes made to the audio file. |
| |
| With the audio file now saved, you can proceed to play it using any audio player of your choice. Upon playback, you will hear the applied noise effect incorporated into the audio. |
| |
| |
|
| |
|
